Enameling Copper Balls
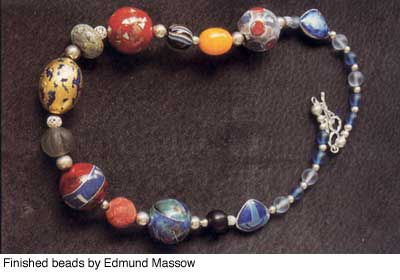
In this article Edmund Massow writes about the process of enameling copper balls. Read through for this interesting take on enameling copper balls used for jewelry and other uses.
Anneal the copper ball to remove grease which may be present. Anneal until the copper color changes to a light gold (at about 300 degrees Celsius). Remove and let cool. Pickle the copper ball in a 10% H
2SO
4 solution or in a solution of 50 grams Alum in a 0.5 liter water. The solutions may be heated to 50 – 60 degrees Celsius. The Alum solution works very well. It is not so sensitive to iron traces and is safer than sulphuric acid! I prefer it in my workshops.
Kay Whitcomb recommends not to enamel the inside of 7/8″ heavy wall balls. If I make my own balls, the wall thickness is thinner and sometimes the diameter is larger. For this reason I also enamel the inside (self evident before polishing the outside of the balls!)
If you want to do so, make a thin slurry of one of the “Thompson” liquid enamels. Fill a syringe (I think your doctor will give you one) with this slurry and fill the inside of the ball. It is a good idea to warm up the ball a bit, because the slurry will stick better to the inside wall. Let the surplus run out. Dry the enamel and fire the ball. The inside need not be completely enameled. It suffices that the greater part of the inside is coated.
When cool, put the ball into the pickling solution until all copper oxide is dissolved. Wash the ball in hot water to remove any solution traces.

Ganoksin is sponsored by
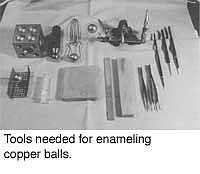
 In the meantime, prepare a pair of ‘cross-tweezers’ to hold the ball when dipping it in liquid enamel. If you don’t have such ‘cross-tweezers’, you can make a similar tool of stainless steel wire (see Figure 1). Use a wire of about 1 mm dia. or a bit stronger and a length of about 20 inches. Wrap the middle of the wire around a 5/8″ dia. round wooden dowel or other round tool to make a loop. Twist to form a section about 1-1/2″ long. Continue as shown, running both ends through the loop and forming the jaws ending with pointed prongs about 3/8″ long to go into the ball. Flatten the loop to provide stability to the jaws.
 If you want to get really transparent colors, you should polish the metal surface of the ball now. It is a bit difficult, but you can do it. Do not use greasy polishing cream. Polish only with non-greasy polish, glass brush, or a similar material. If you have the facilities, polish with water and cerium oxide with a hard felt wheel. Wear cotton gloves during polishing.
I use Thompson’s BC-303L (medium fusing clear transparent) for the base coat. Mix well and pour enough into a container to cover the ball when submerged. (To check the correct consistency of water to liquid enamel, insert a dry finger into the liquid enamel and then remove. The enamel will drain first and then three drops of liquid enamel should drop off your finger, no more no less.)
If you want to get really transparent colors, you should polish the metal surface of the ball now. It is a bit difficult, but you can do it. Do not use greasy polishing cream. Polish only with non-greasy polish, glass brush, or a similar material. If you have the facilities, polish with water and cerium oxide with a hard felt wheel. Wear cotton gloves during polishing.
I use Thompson’s BC-303L (medium fusing clear transparent) for the base coat. Mix well and pour enough into a container to cover the ball when submerged. (To check the correct consistency of water to liquid enamel, insert a dry finger into the liquid enamel and then remove. The enamel will drain first and then three drops of liquid enamel should drop off your finger, no more no less.)
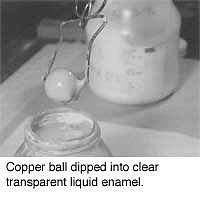
Place the ball into the special tweezers so the points are in both holes. Warm the ball to a temperature of 120 – 140 degrees F (50 – 60 degrees C). Dip the ball into the enamel, submerging it completely. Remove it, allow the surplus to drip off, rotate or turn your wrist to obtain an even coat. Hold near the open kiln door to dry. It may be necessary to continue rotating or turning until the enamel ‘sets’. A thin coat of flux can be sifted on to hasten the ‘setting up’.
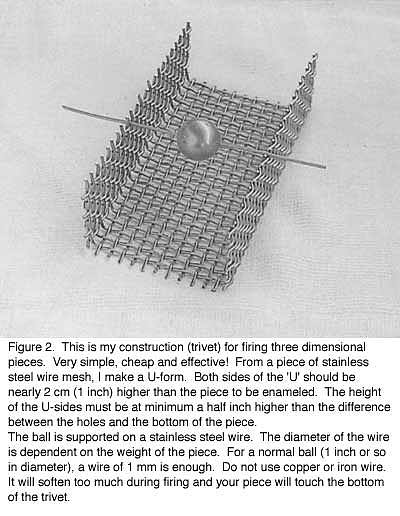 After drying, insert a stainless steel wire through both holes of the ball, put it on a trivet and fire (see Fig. 2). It is better to underfire slightly than to overfire.
If the enameled ball’s surface isn’t completely covered, put the ball again in your pickling solution (sulphuric acid or alum solution) until the scale is removed. Clean the ball, taking care that the inside of the ball is free of any acid or solution, because otherwise you’ll get unpleasant fumes during firing. Recoat as above and fire again. You can repeat these steps until you get a faultless enamel surface.
After drying, insert a stainless steel wire through both holes of the ball, put it on a trivet and fire (see Fig. 2). It is better to underfire slightly than to overfire.
If the enameled ball’s surface isn’t completely covered, put the ball again in your pickling solution (sulphuric acid or alum solution) until the scale is removed. Clean the ball, taking care that the inside of the ball is free of any acid or solution, because otherwise you’ll get unpleasant fumes during firing. Recoat as above and fire again. You can repeat these steps until you get a faultless enamel surface.
Ganoksin is sponsored by
For cloisonne, use round wire of about 0.5 mm. It is better to use short lengths than long ones. Wires can be shaped with the appropriate size hole in a dapping block. To hold the ball in position, I turn a screw, which is about 1-2 mm thicker than the hole, in one of the holes. The other end of the screw I clamp in a ‘third hand’. The ball is well fastened and you can turn it in any direction. If you want to glue wires to steep surfaces (vessels, tubes, etc.) or as shown here on the ball’s surface, it is advisable to roughen up the enamel surface with an alundum stone or diamond file. The glue and wires will not slip so easily on this rough surface.
 Some people glue and fire the wires on a ball in multiple steps. I glue all of them in one step. Use a stronger glue than usual, such as Thompson’s Blu-Stic. Some enamelers have worked successfully with contact glue such as the German brand name ‘Pattex’ or with cyanoacrylate glue, which in German is called ‘Sekunderkleber’, which means ‘sticks in seconds’. I don’t like to use this type of glue because of the possible noxious fumes that may be present during firing.
After gluing the wires and before firing to fasten the wires, sift a very thin 80 mesh clear transparent enamel over the surface, otherwise the wires might fall off during firing. After a short firing and pickling in alum solution or 10% H2SO4 to remove the scale from the wires if you use copper wires, you now can fill the cells with well washed transparent enamels. Put a drop of Klyr-Fire or another organic glue into the enamel and make the mix considerably thicker than usual. Start to fill the enamel on top of the ball.
Some people glue and fire the wires on a ball in multiple steps. I glue all of them in one step. Use a stronger glue than usual, such as Thompson’s Blu-Stic. Some enamelers have worked successfully with contact glue such as the German brand name ‘Pattex’ or with cyanoacrylate glue, which in German is called ‘Sekunderkleber’, which means ‘sticks in seconds’. I don’t like to use this type of glue because of the possible noxious fumes that may be present during firing.
After gluing the wires and before firing to fasten the wires, sift a very thin 80 mesh clear transparent enamel over the surface, otherwise the wires might fall off during firing. After a short firing and pickling in alum solution or 10% H2SO4 to remove the scale from the wires if you use copper wires, you now can fill the cells with well washed transparent enamels. Put a drop of Klyr-Fire or another organic glue into the enamel and make the mix considerably thicker than usual. Start to fill the enamel on top of the ball.
If you have filled the cells on top of the ball, dry the enamel with a paper towel. Turn the ball and start to fill the next part of the cells. Do not fill the cells adjacent to those filled before, but on the opposite side and work toward the previously filled cells. Only at the end connect the second enamel layer with the first. This mode of operation prevents the first layer getting too wet and slipping. Fill the cells in this manner until the whole ball is covered with enamel. Dry thoroughly and fire. You probably must fill the cells a second or third time. Do it in the same manner as before.
After the last firing you can grind and polish the enameled surface for a smooth low gloss finish. For a glossy finish, give it a short refire.
You can make beautiful balls (or beads) by press forming as described in our article in Glass on Metal, August 2000. Enamel inside out as described above.
Using Silver or Gold Foil
If the surface of the ball has a perfect enamel ground coat, glue little scraps of silver or gold foil to the whole surface. To make the foil scraps, fold a piece of transparent paper and lay the foil inside of the folded paper. I prefer a fairly strong transparent paper which is still transparent enough to see the foil.
Make parallel cuts opposite of the ‘folding’ and then crosswise cuts. You get many little rectangular scraps. Glue the foil scraps with a diluted organic glue (Klyr Fire or similar material) to the surface. As glue, I prefer normal wall paper glue (1 spoon glue to 0.2 liters of distilled water). It works very well.
 The scraps must overlap so that you get a closed silver or gold cover. I make at first a lot of little foil scraps as described before, coat one quarter of the surface with glue, pick up the scraps with a wet glue-free water color brush and transfer the scraps to the surface and stroke it with the brush lightly. I make it step by step until the whole surface is covered with foil. Let it dry very well. To press the foil tight to the enameled surface, I roll the ball between my hands. Wear cotton gloves and be sure that the glue is really dry. Fire. After that you can make your cloisonne in the usual manner with silver or gold wire.
In association
Glass On Metal is the only publication dedicated to enameling and related arts. Technical information, book reviews, how-to articles and insight on contemporary enamelers highlight each issue.
Enameling Copper Balls
[i]by[/i] [url=https://www.ganoksin.com/member/edmundmassow/]Edmund Massow[/url]
In this article Edmund Massow writes about the process of enameling copper balls. Read through for this interesting take on enameling copper balls used for jewelry and other uses.
Anneal the copper ball to remove grease which may be present. Anneal until the copper color changes to a light gold (at about 300 degrees Celsius). Remove and let cool. Pickle the copper ball in a 10% H2SO4 solution or in a solution of 50 grams Alum in a 0.5 liter water. The solutions may be heated to 50 – 60 degrees Celsius. The Alum solution works very well. It is not so sensitive to iron traces and is safer than sulphuric acid! I prefer it in my workshops.
[url=https://www.ganoksin.com/wp-content/uploads/2016/06/copperballs-9.jpg][/url]
Kay Whitcomb recommends not to enamel the inside of 7/8″ heavy wall balls. If I make my own balls, the wall thickness is thinner and sometimes the diameter is larger. For this reason I also enamel the inside (self evident before polishing the outside of the balls!)
If you want to do so, make a thin slurry of one of the “Thompson” liquid enamels. Fill a syringe (I think your doctor will give you one) with this slurry and fill the inside of the ball. It is a good idea to warm up the ball a bit, because the slurry will stick better to the inside wall. Let the surplus run out. Dry the enamel and fire the ball. The inside need not be completely enameled. It suffices that the greater part of the inside is coated.
When cool, put the ball into the pickling solution until all copper oxide is dissolved. Wash the ball in hot water to remove any solution traces.
Ganoksin is sponsored by
[url=https://www.ganoksin.com/wp-content/uploads/2016/06/copperballs-1.jpg][/url]
In the meantime, prepare a pair of ‘cross-tweezers’ to hold the ball when dipping it in liquid enamel. If you don’t have such ‘cross-tweezers’, you can make a similar tool of stainless steel wire (see Figure 1). Use a wire of about 1 mm dia. or a bit stronger and a length of about 20 inches. Wrap the middle of the wire around a 5/8″ dia. round wooden dowel or other round tool to make a loop. Twist to form a section about 1-1/2″ long. Continue as shown, running both ends through the loop and forming the jaws ending with pointed prongs about 3/8″ long to go into the ball. Flatten the loop to provide stability to the jaws.
[url=https://www.ganoksin.com/wp-content/uploads/2016/06/copperballs-3.jpg][/url]
If you want to get really transparent colors, you should polish the metal surface of the ball now. It is a bit difficult, but you can do it. Do not use greasy polishing cream. Polish only with non-greasy polish, glass brush, or a similar material. If you have the facilities, polish with water and cerium oxide with a hard felt wheel. Wear cotton gloves during polishing.
I use Thompson’s BC-303L (medium fusing clear transparent) for the base coat. Mix well and pour enough into a container to cover the ball when submerged. (To check the correct consistency of water to liquid enamel, insert a dry finger into the liquid enamel and then remove. The enamel will drain first and then three drops of liquid enamel should drop off your finger, no more no less.)
[url=https://www.ganoksin.com/wp-content/uploads/2016/06/copperballs-4.jpg][/url]
Place the ball into the special tweezers so the points are in both holes. Warm the ball to a temperature of 120 – 140 degrees F (50 – 60 degrees C). Dip the ball into the enamel, submerging it completely. Remove it, allow the surplus to drip off, rotate or turn your wrist to obtain an even coat. Hold near the open kiln door to dry. It may be necessary to continue rotating or turning until the enamel ‘sets’. A thin coat of flux can be sifted on to hasten the ‘setting up’.
[url=https://www.ganoksin.com/wp-content/uploads/2016/06/copperballs-2.jpg][/url]
After drying, insert a stainless steel wire through both holes of the ball, put it on a trivet and fire (see Fig. 2). It is better to underfire slightly than to overfire.
If the enameled ball’s surface isn’t completely covered, put the ball again in your pickling solution (sulphuric acid or alum solution) until the scale is removed. Clean the ball, taking care that the inside of the ball is free of any acid or solution, because otherwise you’ll get unpleasant fumes during firing. Recoat as above and fire again. You can repeat these steps until you get a faultless enamel surface.
Ganoksin is sponsored by
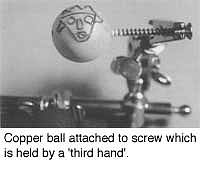
For cloisonne, use round wire of about 0.5 mm. It is better to use short lengths than long ones. Wires can be shaped with the appropriate size hole in a dapping block. To hold the ball in position, I turn a screw, which is about 1-2 mm thicker than the hole, in one of the holes. The other end of the screw I clamp in a ‘third hand’. The ball is well fastened and you can turn it in any direction. If you want to glue wires to steep surfaces (vessels, tubes, etc.) or as shown here on the ball’s surface, it is advisable to roughen up the enamel surface with an alundum stone or diamond file. The glue and wires will not slip so easily on this rough surface.
[url=https://www.ganoksin.com/wp-content/uploads/2016/06/copperballs-5.jpg][/url]
Some people glue and fire the wires on a ball in multiple steps. I glue all of them in one step. Use a stronger glue than usual, such as Thompson’s Blu-Stic. Some enamelers have worked successfully with contact glue such as the German brand name ‘Pattex’ or with cyanoacrylate glue, which in German is called ‘Sekunderkleber’, which means ‘sticks in seconds’. I don’t like to use this type of glue because of the possible noxious fumes that may be present during firing.
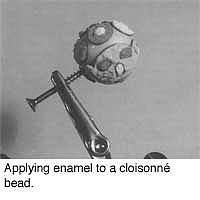
After gluing the wires and before firing to fasten the wires, sift a very thin 80 mesh clear transparent enamel over the surface, otherwise the wires might fall off during firing. After a short firing and pickling in alum solution or 10% H2SO4 to remove the scale from the wires if you use copper wires, you now can fill the cells with well washed transparent enamels. Put a drop of Klyr-Fire or another organic glue into the enamel and make the mix considerably thicker than usual. Start to fill the enamel on top of the ball.
[url=https://www.ganoksin.com/wp-content/uploads/2016/06/copperballs-6.jpg][/url]
If you have filled the cells on top of the ball, dry the enamel with a paper towel. Turn the ball and start to fill the next part of the cells. Do not fill the cells adjacent to those filled before, but on the opposite side and work toward the previously filled cells. Only at the end connect the second enamel layer with the first. This mode of operation prevents the first layer getting too wet and slipping. Fill the cells in this manner until the whole ball is covered with enamel. Dry thoroughly and fire. You probably must fill the cells a second or third time. Do it in the same manner as before.
[url=https://www.ganoksin.com/wp-content/uploads/2016/06/copperballs-7.jpg][/url]
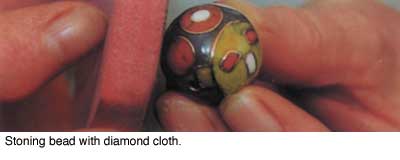
After the last firing you can grind and polish the enameled surface for a smooth low gloss finish. For a glossy finish, give it a short refire.
You can make beautiful balls (or beads) by press forming as described in our article in Glass on Metal, August 2000. Enamel inside out as described above.
Using Silver or Gold Foil
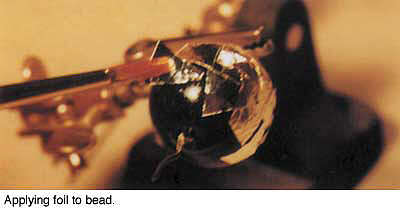
If the surface of the ball has a perfect enamel ground coat, glue little scraps of silver or gold foil to the whole surface. To make the foil scraps, fold a piece of transparent paper and lay the foil inside of the folded paper. I prefer a fairly strong transparent paper which is still transparent enough to see the foil.
[url=https://www.ganoksin.com/wp-content/uploads/2016/06/copperballs-8.jpg][/url]
Make parallel cuts opposite of the ‘folding’ and then crosswise cuts. You get many little rectangular scraps. Glue the foil scraps with a diluted organic glue (Klyr Fire or similar material) to the surface. As glue, I prefer normal wall paper glue (1 spoon glue to 0.2 liters of distilled water). It works very well.
[url=https://www.ganoksin.com/wp-content/uploads/2016/06/copperballs-10.jpg][/url]
The scraps must overlap so that you get a closed silver or gold cover. I make at first a lot of little foil scraps as described before, coat one quarter of the surface with glue, pick up the scraps with a wet glue-free water color brush and transfer the scraps to the surface and stroke it with the brush lightly. I make it step by step until the whole surface is covered with foil. Let it dry very well. To press the foil tight to the enameled surface, I roll the ball between my hands. Wear cotton gloves and be sure that the glue is really dry. Fire. After that you can make your cloisonne in the usual manner with silver or gold wire.
By Edmund Massow - © [url=http://www.glass-on-metal.com/]Glass On Metal[/url] - Vol. 19, Number 4, October 2000
In association
[url=http://www.glass-on-metal.com/]

[/url]
[url=http://www.glass-on-metal.com/]Glass On Metal[/url] is the only publication dedicated to enameling and related arts. Technical information, book reviews, how-to articles and insight on contemporary enamelers highlight each issue.